Showing posts with label diy. Show all posts

Tuesday, June 3, 2014

thin mint cupcakes.


It's been quite awhile since I've done a recipe or DIY post so I figured it was long overdue. So, I may have ordered an entire case of Thin Mint Girl Scout cookies earlier this spring...and every time I open the pantry there they are. Staring at me. I figured I should try and use them and get them out of the house...so here you go, Thin Mint Cupcakes! I found tons of recipes on Pinterest, but this one from Your Cup of Cake is my favorite...I made just a few slight modifications...


Thin Mint Cupcakes


Chocolate Cake Ingredients:
  • 1 box devil's food cake mix
  • 3 eggs
  • 1/2 cup vegetable oil
  • 1 cup milk
  • 1/2 cup sour cream
  • 2 teaspoons vanilla extract

Thin Mint Frosting Ingredients:
  • 1 cup butter, room temperature (NOT melted)
  • 1/3 cup cocoa powder
  • 2 teaspoons vanilla extract
  • 2 teaspoons peppermint extract
  • 1/4 cup sour cream
  • 10 Thin Mint cookies, crushed
  • 4 cups powdered sugar
  • Chocolate sprinkles
  • Extra Thin Mints for decoration (cut in half)

Directions:
  1. Preheat oven to 350 degrees and line pans with cupcake liners (I used green to scream 'MINT!')
  2. Pour cake mix into a small bowl and set aside
  3. In a large bowl, combine eggs, butter, milk, and vanilla extract until smooth
  4. Stir in cake mix
  5. Fill cupcake liners 2/3 full and bake for approximately 18 minutes, or until an toothpick or knife comes out clean
  6. Let cool completely 
  7. On to the frosting! 
  8. Using an electric mixer, beat butter for 2 minutes
  9. Add cocoa powder, vanilla extract, peppermint extract, and sour cream and beat again
  10. Add crushed cookies, and add in powdered sugar (one cup at a time) until frosting is stiff enough to make peaks
  11. Using a frosting bag or gun, pipe frosting onto cooled cupcakes 
  12. Top with sprinkles and extra cookies!


And voila, my favorite cookies are now my new favorite cupcakes! Enjoy!

xoxo,

Wednesday, March 5, 2014

diy: dry shampoo for dark hair


Dry shampoo is something I discovered within past year and it's been a life saver! Not only does washing your every few days save time, but it's also less drying for your hair, and you're saving your hair from the trauma of heat styling every single day. The biggest bonus for me though is getting to sleep in a little longer :)

I've tried a couple of different brands of dry shampoo, and while they work fine they also leave a not-so-cute powdery sheen on my dark brown hair. So while my hair is oil-free, it's also grey. Not cute.

When I mentioned this problem to a co-worker of mine, she suggested making my own, and adding cocoa powder to the recipe to help blend into the color of my hair. Genius!

After a quick Google search I found that the ingredients for dry shampoo were already in my kitchen:

  • corn starch
  • cocoa powder 

Seriously, that's it! I mixed together three tablespoons of each into a small bowl and carefully poured the mixture into a clean glass shaker (Target, $2.99). I added a label, and voila, DONE!

To use, simply sprinkle the dry shampoo mixture onto your roots (I generally focus on my hairline and part). Gently rub the powder into your hair, then brush out, and finish off with a quick blast from your blow dryer and style as normal.

There you go, super simple! Have any of you tried a diy dry shampoo? Leave your comments below!


xoxo,

Monday, August 5, 2013

diy: work-out tank top


Happy Monday!

So if you're ever on Pinterest I'm sure you've seen the DIY workout tank tops, and I thought I'd give it a shot myself over the weekend. I have so many race t-shirts that just don't fit the way I'd like (ie they're HUGE) and thought this might be a great way to get some use out of them. For this example, I decided to use a cute t-shirt I got in the kids department at Old Navy :)


This is a super easy DIY project...all you really need is a t-shirt, pencil, and a sharp pair of scissors!


First off, lay your shirt out on a flat surface and lightly draw a curved line where you'd like to cut the sleeves off your shirt. You can use an existing racer back tank as a pattern if you like, but I just decided to go for it!


Next, cut off both arms from the t-shirt, trying your best to make sure both sides are even.


You'll want to cut off the neck of the t-shirt next...and be sure to make the front lower than the back.


The next thing I did was cut off the bottom hem of the shirt (save this piece!)...then turn the shirt sideways to cut a small amount off the front of the shirt (see photo below). This will make the tank top fit better once you're done!


Taking the hem of the t-shirt that you saved, cut off about 8 inches, and tie this around the back of the tank, creating the "racer back" look. Make sure you tie a really tight knot...or you could sew a nice seam, but really, this is supposed to be easy! :)


Once you've tied your tight knot, trim off the ends and turn it around so you have a clean band of fabric (see photo above).


Try on your new racer back work out tank top and you're done!  What a great way to make use out of all those old t-shirts you have lying around :)

xoxo,

Wednesday, June 12, 2013

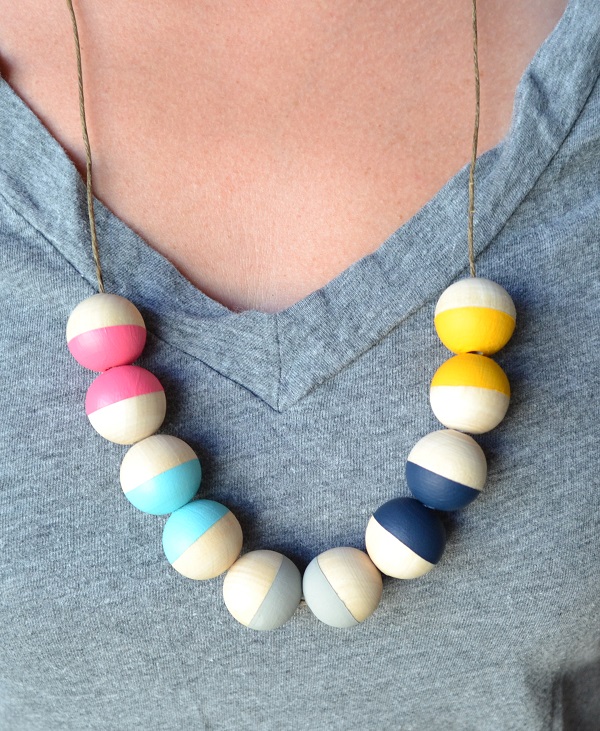
diy: painted wood bead necklace

 
Since I still haven't gotten around to taking new "What I Wore" photos, I thought I'd share a simple DIY project I worked on last week...and yes, this project is Pinterest-inspired!


Supplies


  • 10 wood beads (I used 1" beads, but you can use smaller or larger if you like!)
  • blue painters tape
  • five of your favorite shades of acrylic paint
  • small sponge brush
  • plate or palette
  • twine or cord


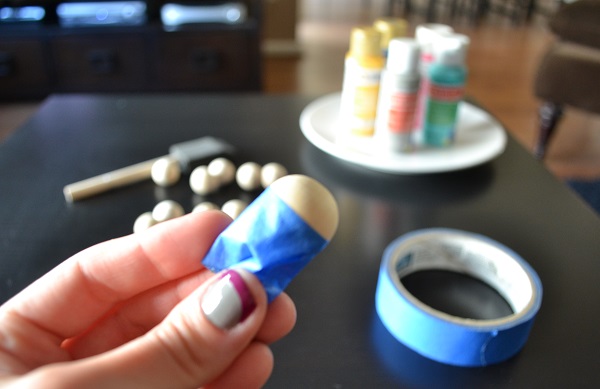
Begin by placing the painted tape horizontally across each bead, making sure the ends overlap so you have a clean line.


Squeeze a small amount of each shade of paint onto your plate...you really only need a small amount.


Using your sponge brush, apply the paint to each bead (two beads for each shade of paint). Allow to dry just slightly, and paint two more coats to ensure a solid, well covered color.

Once each bead is painted, gently place on waxed paper to dry for about 30 minutes.


When the beads are dry to the touch, carefully remove the painters tape from each bead.


Next,  string the beads onto the twine...be sure that each color is facing each other (see image below).


Once the beads are strung, simply tie the ends of the twine into a knot (making sure that your necklace will easily slip over your head). Now you're ready to pair your new DIY necklace with all your favorite summer outfits!

I hope you enjoyed...happy Wednesday!

xoxo,

Thursday, May 30, 2013

healthy banana oat peanut butter cookies.


Don't worry...long name, short recipe :)

Despite the recipes I've featured (to date) on Andrea Everyday, I normally eat a fairly clean, healthy diet. I try to stick with fresh, unprocessed foods when I can, and I wanted to feature a recipe of the same sort. So now I bring you my recipe for "Healthy Cookies." These are really simple to make, and only contain five ingredients!


Healthy Banana Oat Peanut Butter Cookies


  • 3-4 very ripe bananas
  • 1 3/4 cups dry oats
  • 1/2 cup peanut butter
  • 1 tablespoon honey
  • 1/2 cup chocolate chips (optional)

Mix all your ingredients together in a bowl...make sure you mash the bananas very well!


Next, spoon onto a baking sheet about three inches apart and bake at 350 degrees for 15 minutes.


Using a spatula, carefully remove each cookie from the baking sheet immediately after removing from the oven, and place onto cooling racks or a large plate. Don't wait until the cookies have cooled, or they'll be stuck!

That's it..short and sweet! Just about the easiest recipe there is! Enjoy!

xoxo,

Wednesday, May 22, 2013

chocolate raspberry cupcakes.


For years, cupcakes have been my dessert of choice...not only to eat but also to bake! I know that in today's world of Pinterest and DIYing I really should be making these entirely from scratch, but I have to admit that while I make the frosting from scratch, I always make cupcakes from a box. Yes, I know Martha would be disappointed. However, I've yet to receive a complaint, so if you're looking for an easy, yet amazingly delicious dessert...here it is!


First of all, select your favorite brand of boxed chocolate cake mix, along with the additional required ingredients the box calls for (eggs, water, and vegetable oil in this case). Go ahead and bake in your cupcake pans according the box instructions. Once you remove them from the oven, let them cool completely.

Hint: I usually place my fresh-out-of-the-oven cupcakes on a serving tray and stick in the fridge for 30 minutes or so to speed the cooling process!

While the cupcakes are cooling, you can prepare the frosting...

Raspberry Cream Cheese Frosting

  • 3-4 cups powdered sugar
  • 1/8 stick of butter, room temperature
  • 1 teaspoon vanilla extract
  • 4 ounces cream cheese (half a package), room temperature
  • 1/2 cup fresh raspberries (plus additional for decoration) 

Using either a hand or a stand mixer, cream together the room temperature (must be soft or you're going to have a really difficult time mixing!) butter, cream cheese, and vanilla. Add the fresh raspberries to the mixture...the mixing blades will chop the raspberries for you, creating a beautiful pink color! Slowly add the powdered sugar, about 1/2 cup at a time, and mix on low with a hand mixer. Continue adding 1/2 a cup of powdered sugar at a time, until the frosting is stiff enough to form 'peaks.' If it's too soft, the frosting will not stay put on the cupcakes.

Next, frost each cupcake generously, either using a knife the old fashioned way, or using an icing bag/frosting gun like I did. Each tip will create a different "look," but I didn't use a tip for this batch and simply used the frosting gun without one for a smooth look.

Once each cupcake is frosted, add a fresh raspberry to the top of each one, and voila, you're done!


Enjoy!

xoxo,

Tuesday, April 23, 2013

s'mores brownies.

I first discovered the "s'mores brownies" on Pinterest, "liked" the pin, then by the time I got around to making them, I couldn't find the recipe! As a result, I improvised and put together my own recipe. However, I'll admit I'm sort of cheating here...the brownies are from a box. But hey, when crunched for time these are the perfect dessert to whip up in less than 45 minutes!


First off, you'll need a box of your favorite brownie mix, along with the required additional items the recipe calls for (vegetable oil, water, and two eggs in this case). For the "s'mores" portion you'll need about half a bag of mini marshmallows, one packet of graham crackers, and a large milk chocolate bar.


Go ahead and prepare the brownie batter according to the back of the box and pour into a 9x13" baking dish. Preheat your oven according to the instructions on the box...but reduce the baking time by about 3-5 minutes.


Once you pull the brownies out of the oven, generously cover the entire surface with your mini marshmallows, milk chocolate pieces, and crumbled graham crackers.


Place the dish back into the oven, and set the broiler for about 3-5 minutes. Each oven is different, so pay careful attention that your brownies aren't getting burnt to a crisp...you just want the chocolate slightly melted and marshmallows lightly browned!


Once complete, remove the dish from the oven and let cool for about 15 minutes...careful, the marshmallows will be HOT! Once cooled, cut into squares and enjoy!

xoxo,

Tuesday, March 26, 2013

red chili + chicken enchiladas.


Growing up in New Mexico, practically every meal was accompanied by either red or green chili. It's something that every New Mexican is accustomed to, yet isn't readily available in other parts of the country. After moving to Northern California I found it was nearly impossible to find traditional New Mexican chili. Chili from Anaheim yes (not the same!), but nothing labeled, "New Mexican." After a bit of research, I found I was able to order chili by the jar from one of my favorite hometown restaurants, El Pinto. Naturally, I ordered an entire case...no big deal.

This is a really simple recipe that I slightly modified to make a little healthier (traditional recipes usually call for ground beef and frying the tortillas before baking). This can be prepared with any red or green chili you find at the grocery store, but New Mexican red chili is my favorite. 


red chili + chicken enchiladas
  • 16 oz. jar of red chili
  • 12 corn tortillas
  • 2 cups shredded reduced fat cheddar cheese
  • 2 chicken breasts, cooked and diced
  • 1  diced tomato
  • finely chopped onion (optional)
  • 1 cup shredded spinach


First, start by cooking the chicken breasts using your favorite method (I boiled mine), and dicing them up into small pieces. Next, layer four corn tortillas into a 9x9 glass baking dish. Spread on a generous layer of the red chili, topped with about half the diced chicken, followed by a couple of handfuls of the shredded cheese.


Continue with another layer of four corn tortillas, topped with red chili, the remaining chicken, and more shredded cheese. For the top layer, finish off with the last four tortillas, a generous layer of red chili (it should  be smothered), and the rest of the shredded cheese. You should see three layers in your baking dish by this point.

Place the baking dish into your oven, pre-heated to 375 degrees for about 30 minutes, or until the cheese is melted and edges are beginning to brown.


Allow the enchiladas to cool for about 10 minutes, then cut into four servings. Top with diced tomatoes, onions, and shredded spinach. Enjoy!

xoxo,